What is Kagan?By no means do I know everything there is to know about Dr. Kagan and all of the teaching strategies he has to offer. Nor am I an expert at using them. In fact, I am a brand new elementary teacher, trying out the simple strategies I picked up from a PD this past year that was called "Kagan's Cooperative Learning Structures." Ever since the PD, I had been dying to try it out in my own classroom. I'm currently teaching 4th grade this summer for an enrichment program, so I have finally been able to test it all out before August rolls around. I can tell you from first hand experience as a NEWBIE that these simple strategies change the game. I surely wish I knew about them when I started my first year because it would have made my lessons more engaging while also keeping my classroom highly structured. So obviously at this point you want to know what this Kagan stuff entails. Before you read on, view the video. It'll give you brief explanations on each structure. But really, it's simple. Think of "turn-and-talks" and "think pair shares." Think of the times you vaguely tell your class to "talk to the person next to you." I had used these phrases during my first year all of the time. Along with other first year teacher mistakes, using these phrases made for some not-so-engaging "discussions" in my classroom. Kagan offers two strategies, which are The Essential 5, and a specific seating arrangement. Again there's probably more out there that I've yet to discover, but these are the basics to get anyone started. The Seating StructurePlanning out the seating arrangement comes first. It's always a challenging jigsaw to figure out your seating arrangement, especially once you get to know the students. But let me start out by saying that you don't need to know the students when you arrange your desks. Last week, before the students' first day, I followed Kagan's structure by putting the desks in groups of 4. He recommends even numbers, but currently I have 2 groups of 5, and 2 groups of 4, and it is working out just fine. At the corner of each desk, where all of the desks meet, you will number them 1 to 4. Next to each number you will alternately label the desk an A or a B. Make sure each desk is next to, and in front of, the opposing letter. With this desk structure, it doesn't matter where you move students. When a desk is labeled this way, whoever happens to be sitting in it will know who to talk to and when to talk. *Sidenote: I never wrote students' names on the desks. I learn names very quickly so I didn't need them. So when it comes to slightly more permanent seat changes, my suggestion would be to not use tags at all or use ones that will move with the student. Sidenote 2: I used sharpie paint markers to write the numbers and letters on the desks. These are safe to write on our glossy desks… the ink dissolves when you color over it with Expo marker and wipe off. Put the Seating Structure into PracticeThe seating structure allows you to do all sorts of tasks and activities in an organized fashion. You could use it to your own advantage by assigning simple jobs. "All 1's please bring a caddy to your table." "All 3's please collect your group's notebooks and bring them to my desk." The real purpose of the structure is to ensure engagement for all students. Mainly, it facilitates the Essential 5. So for example, during a Timed Pair Share, you'd say something like "A's, you will start the conversation during this first round. Tell your shoulder partner what you did this weekend. B's will share out. You have 30 seconds…go!" Then you'd switch. Sometimes I also like to have students check on each other. "A's high five your face partner if they are listening." Or I'll do a quick attention grabber during a transition "all 3's tap your elbows," all B's pat your head." It's so simple and straightforward, but it will keep everyone on their toes. | 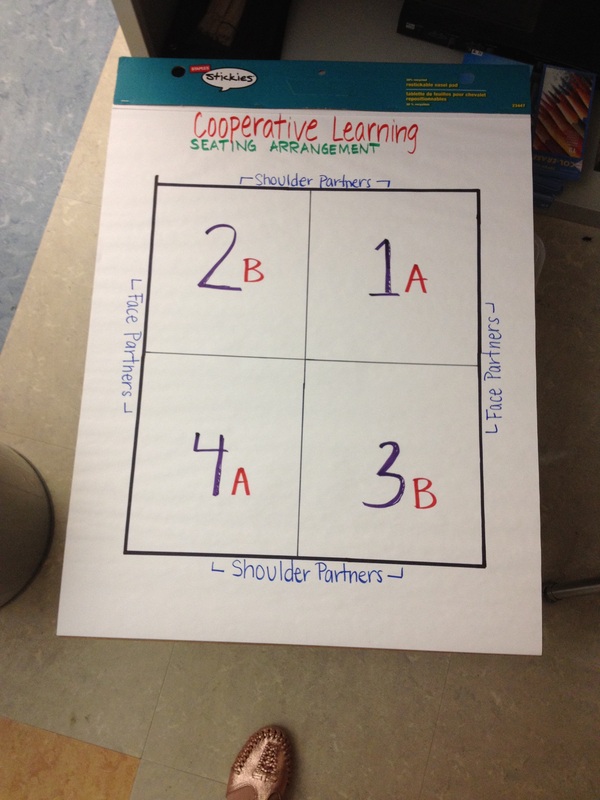 The Essential 5As the video explains, the Essential 5 includes five very basic cooperative learning structures that include Timed Pair Share, Round Robin, Rally Coach, Stand Up Hands Up, and Rally Robin. So far I have tried 3 of these in my classroom (although during the PD, the presenter incorporated all of these structures so that we could participate in them hands on.) Since the video already explains them, I'll just add that the Round Robin comes with a couple variations. I've done both an All-Talk Round Robin, and an All-Write Round Robin. The only difference is that with the latter variation, students are writing their ideas down first (say on a sticky note or notebook), and then sharing out loud in the numerical order that you assign. Sometimes I start with the "1's" but it's always good to change it up so that student isn't always the first to share. Again, a structure as simple as this will faciliate engagement for ALL students. That's the main thing that Kagan wants to emphasize. Final ThoughtsWhen these structures are taught explicitly and practiced regularly and consistently, then they will be effective. If you combine a timer, an effective seating arrangement, pre-assigned partners and groups, and a "think pair share" or "round robin" session, then you begin to realize how much more purposeful and engaging the learning becomes. Of course, I'm a newbie, so I might sound overly excited about a technique so simple. But…maybe some of you out there are lacking that extra bit of structure like I did during my first year, so my only hope is that this post was helpful to at least some folks who were willing to read an unnecessarily long explanation for a very simple concept. |
*UPDATE: I want to add that at the end of each school day for the first 3 days, I changed student's seats around completely. This helped me to get to know them and observe where and with whom they work best. After 3 days, I put together a more permanent seating arrangement. Every now and then I still switch around students based on behavior, level of cooperation with surrounding peers, and ability (based on informal assessments). In a table of 4, I prefer to have two "low-medium" students sitting in front of each other, with a "medium-high" student next to each of them. This way, student A who might be low/medium will have a companion who is medium/high as their shoulder partner, and a companion who is closer to their ability level as their face partner. Having these seats pre-arranged makes it VERY easy to do activities such as jigsaws when I want to have homogenous groups and heterogenous groups. If all of my low/medium students are already sitting at all of the desks labeled as "2's" and "4's" then it's easy to identify them and put them in the same expert groups for a jigsaw. Likewise for my medium/high students.
 RSS Feed